
Publishing your Android app
Once you have design, coded and tested your Android app it’s time to publish it on Google Play. In what follows, we discuss the necessary minimum steps to clean up your app, ready it for publishing and the ship it to the global marketplace. It is difficult to make a make a splash these days with over 800,000 apps on play but you could be the next mobile success so dream big.
Resources
The best resources for understanding the publication process are as follows:
- Publishing overview discusses the general process that makes your Android applications available to users.
- Publishing Checklist for Google Play discuss that before you can publish your app on Google Play and distribute it to users, you need to get the app ready, test it, and prepare your promotional materials.
- Preparing for Release discusses that before you distribute your Android application to users you need to prepare it for release.
- Google account that will be associated with your Developer Console
- Stackoverflow tips to publish discuss that there is more to this than meets the eye.
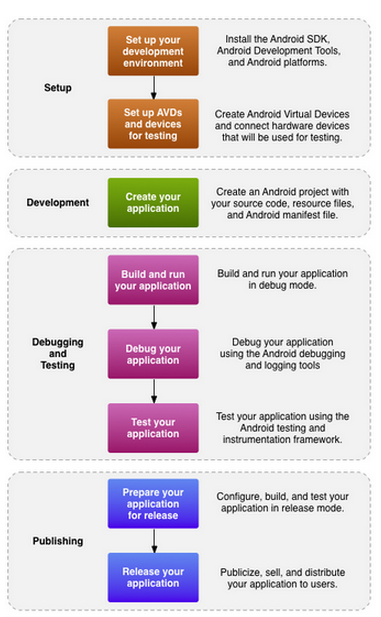
Workflow
The figure below shows the complete workflow for an Android app from conception to publishing it on Play. We’ve skipped a number of important phases when developing MyRuns — we’ve not done functional or unit testing of any kind — that’s bad. We haven’t fully tested all the edge cases. Setting that aside for the moment an app as a best practice, your application should meet all of your release criteria for functionality, performance, and stability before you begin the publishing process.

In what follows, we describe an abbreviated set of steps to release your app; these are:
- Step 1: Preparing your app for release
- Step 2: Signing your app
- Step 3: Uploading your app to play
Step 1: Preparing your app for release
We first discuss the package name. Then you need to make sure all debug information in your code is turned off or removed. Finally, if your app has a cloud side you need to prepare the server side and test with the phone app.
Choose a good package name
Over the past 7 weeks we have all used the same set of package names to reflect the incremental MyRuns app; edu.dartmouth.cs.myruns1, etc. The problem is everyone has used the same package name and that won’t work at app distribution time. This is acceptable in the debug phase of application development but when you are going to release the app, you have to use a unique package name for Google to identify your app. That means you can’t use “edu.dartmouth.cs.myruns” as your package name to release on Play. You have to use another package name that is unique and hence avoids name conflicts. That’s probably a reason why people use domain name to be their package name. Make sure you choose a package name that is suitable over the life of your application. You cannot change the package name after you distribute your application to users. As you know you set the package name in application’s manifest file.
Turn off all logging and debugging in your code
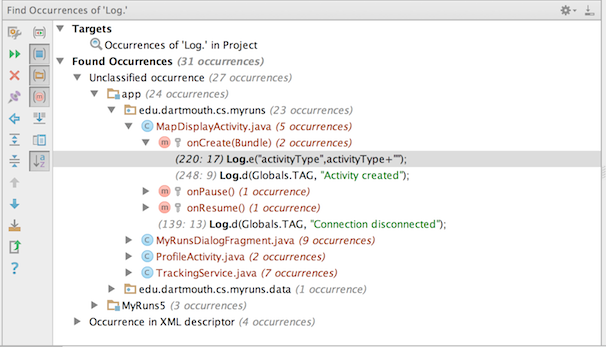
Make sure you deactivate logging and disable the debugging option (you haven’t used the debugging option) before you build your application for release. You can deactivate logging by removing calls to Log methods in your source files. You can disable debugging by removing the android:debuggable attribute from the tag in your manifest file, or by setting the android:debuggable attribute to false in your manifest file. Also, make sure you remove any log files or static test files that were created in your project for debugging purposes.
Clean up the project directories
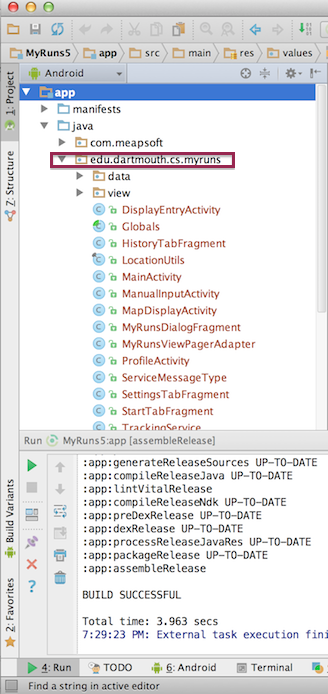
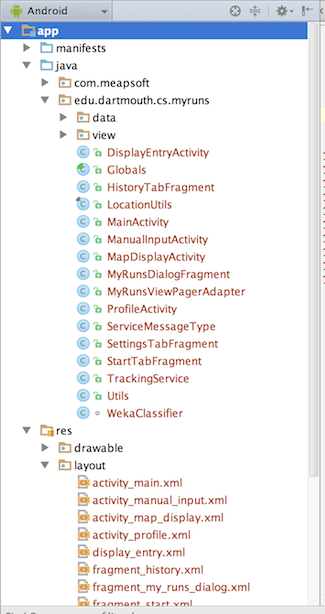
Clean up your project directories. Clean up your project and make sure it conforms to the directory structure described in Android Projects. At a minimum you should do the following cleanup tasks — check all these in ProjectExplorer, as shown below:
- Review the contents of your lib/ and src/ directories. The src/directory should contain only the source files for your application (.java and .aidl files). The src/ directory should not contain any .jar files.
- Look in your project’s res/ directory for old drawable files, layout files, and values files that you are no longer using and delete them.
- Check your lib/ directory for test libraries and remove them if they are no longer being used by your application.
- Review the contents of your assets/ directory and your res/raw/ directory for raw asset files and static files that you need to update or remove prior to release.
Manifest settings
Review and update your manifest settings. Verify that the following manifest items are set correctly:
- <uses-permission> element: You should specify only those permissions that are relevant and required for your application.
- android:icon and android:label attributes: You must specify values for these attributes, which are located in the element.
- android:versionCode and android:versionName attributes.
   android:versionCode="1"
   android:versionName="1.0"
We recommend that you specify values for these attributes, which are located in the element. For more information see Versioning your Application.
There are several additional manifest elements that you can set if you are releasing your application on Google Play. For example, the android:minSdkVersion and android:targetSdkVersion attributes, which are located in the build.gradle in the app module.
        minSdkVersion 21
        targetSdkVersion 21
You might want to lower the minSdkVersion to have more users from older phones, but be sure that you’ve tested on these versions.
Update URLs for servers and services
If you are using a server in your team project (we use servers in MyRun6), you need to change the server address to the one that you tend to use for the public. Implement Licensing (if you are releasing on Google Play). If you are releasing a paid application through Google Play, consider adding support for Google Play Licensing. Licensing lets you control access to your application based on whether the current user has purchased it. Using Google Play Licensing is optional even if you are releasing your app through Google Play.
Step 2: Signing your app
The Android system requires that all installed applications are digitally signed with a certificate whose private key is held by the application’s developer. While debugging, the build tools sign your application automatically with a special debug key that is created by the Android SDK build tools. When you are ready to release your application to users, you must sign it with a suitable private key on your own. You cannot publish an application that is signed with the debug key generated by the SDK tools.
If you are using Android Studio, you can go to https://developer.android.com/tools/publishing/app-signing.html to see how to create a signed apk from your project.
Step 3: Uploading your app to play
If you have gone through the steps above, you should have a release-ready version of apk for the public now. You can release it on website, email or Google Play store. You can simply email the apk to people to install — not Play store needed for that. You can offer the app from a website; or best, upload to Play and complete the workflow. We will discuss the website and Play options below.
Releasing through a website. If you do not want to release your app on a marketplace like Google Play, you can make the app available for download on your own website or server, including on a private or enterprise server. To do this, you must first prepare your application for release in the normal way. Then all you need to do is host the release-ready APK file on your website and provide a download link to users.
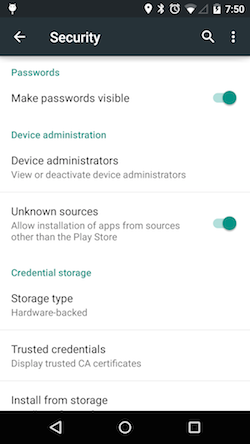
When users browse to the download link from their Android-powered devices, the file is downloaded and Android system automatically starts installing it on the device. However, the installation process will start automatically only if the user has configured their settings on your phone to allow the installation of apps from unknown sources.
Although it is relatively easy to release your application on your own website, it can be inefficient. For example, if you want to monetize your application you will have to process and track all financial transactions yourself and you will not be able to use Google Play’s In-app Billing service to sell in-app products. In addition, you will not be able to use the Licensing service to help prevent unauthorized installation and use of your application.
Releasing through an App Marketplace. If you want to distribute your apps to the broadest possible audience, releasing through an app marketplace such as Google Play is ideal.
The steps are as follows:
- Go to the publish page
- Read the agreement, review the distribution of countries where you can distribute and sell applications — you need a credit card and $25.00. For this class we will publish your project apps through our internal account.

- Now you can add your first application to the Play store. Before publishing you need to upload the signed apk and add some descriptions in the store listing section to your app.

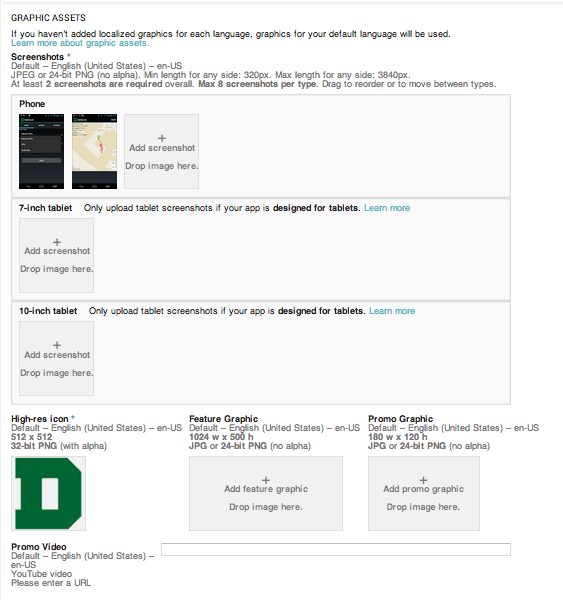
You have to fill the requested information in the store listing before publish it. Things you need to specify include:
- text description of the app and how great it is
- graphic asset (one high resolution icon and at least two screenshots)
- categorization (e.g., social nets, games)
- developer’s contact details, etc.
You are done! You are Android
That is it. You are done. Done with the taught part of the course. You have completed the following and should be proud of your new skills. These are very marketable — or your money back.
We have covered the complete workflow (minus testing) for the MyRuns app — soup to nuts.
Next the project phase. You will build an amazing app that uses Bio data and release it via Play.